

Last Updated on February 17, 2024 by Arnav Sharma
I recently compiled all (all of the available resources in TF) the components and deployed them using Terraform.
To deploy a complete setup, just change 3 inputs and the complete sentinel solution should be up and running in 10-15 mins.
Here’s the code to set up Sentinel using Terraform and Terragrut.
Repo: sharmaarnav/as-sentinel (github.com)
Changes needed to deploy Sentinel: Go to the terragrunt.hcl file in the production folder and modify:
- Prefix – this sets names for all resources
- Location
- And set if you have enabled P2 license in AD and E5 in O365. (Set the value to 0 if you don’t have a license and set 1 if you have activated the license)

No other changes are needed apart from the basics (authentication, terraform and terragrunt)
Resources Deployed:
- A resource group
- Log Analytics Workspace
- Solution – SecurityInsights
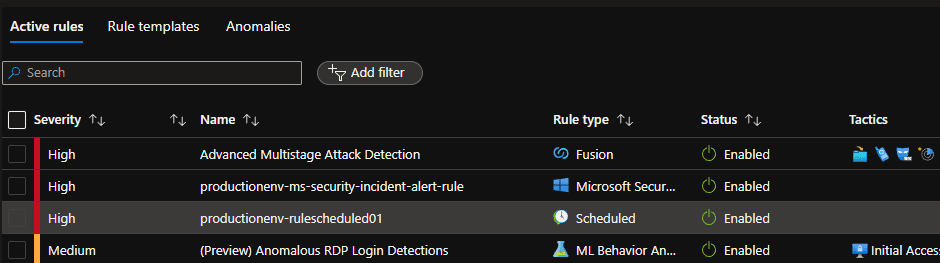
- Sentinel Fusion Alert Rule.
- Sentinel Machine Learning Behavior Analytics Alert Rule.
- Sentinel MS Security Incident Alert Rule.
- Sentinel Scheduled Alert Rule.
- Sentinel Automation Rule.
- Connector to O365
- Connector to AAD
- Connector to App Security
- Connector to ATP
- Connector to Microsoft Defender ATP
- Connector to Cloud Security

The code:
Source modules: as-sentinel/Modules at main · sharmaarnav/as-sentinel (github.com)
Live Repo: as-sentinel/SentinelLiveRepo/Production at main · sharmaarnav/as-sentinel (github.com)
To Deploy:
- Fork the repo and clone to your system. Open the related path using VSCode or other tools.
- Browse to the production folder and update the terragrunt.hcl file.
- Use terragrunt run-all apply command to deploy.
(PS – You need to install Terragrunt and Terraform to have this up and running)
Code Structure:
Red: Modules
Yellow: Live code

Q: What is Azure Sentinel?
A: Azure Sentinel is a cloud-native security information and event management (SIEM) solution that provides intelligent security analytics and threat intelligence across the enterprise.
Q: What is Terraform?
A: Terraform is an infrastructure-as-code (IAC) tool that allows you to define and manage your infrastructure in a declarative manner.
Q: How can I use Terraform to deploy Azure Sentinel?
A: You can use Terraform to deploy Azure Sentinel by creating a Terraform module that defines the resources required by Azure Sentinel. You can then use Terraform to deploy the module to your Azure subscription.
Q: What is a Terraform module?
A: A Terraform module is a collection of Terraform code that can be used to deploy a specific set of resources in a repeatable manner.
Q: How do I manage my Azure Sentinel infrastructure using Terraform?
A: You can manage your Azure Sentinel infrastructure using Terraform by defining your infrastructure as code in Terraform files and then using Terraform commands to apply changes to your infrastructure.
Q: What is Terragrunt?
A: Terragrunt is a tool that provides extra functionality on top of Terraform, allowing you to manage multiple Terraform modules, provide configuration via a centralized repository, and more.
Q: How do I deploy my Terraform code using Terragrunt?
A: You can deploy your Terraform code using Terragrunt by defining your infrastructure as code in Terraform files, creating Terragrunt configurations that reference your Terraform files, and then using Terragrunt commands to apply changes to your infrastructure.
Q: What is the Azure Sentinel Terraform module?
A: The Azure Sentinel Terraform module is a Terraform module that contains the resources required to deploy Azure Sentinel, including Azure Sentinel workspaces, Log Analytics workspaces, storage accounts, and more.
Q: How do I update my Azure Sentinel infrastructure using Terraform?
A: You can update your Azure Sentinel infrastructure using Terraform by modifying your Terraform code to reflect the desired changes and then using Terraform commands to apply those changes to your infrastructure.
Q: What is the Terraform Registry?
A: The Terraform Registry is a central repository for Terraform modules that allows you to discover, publish, and deploy Terraform code.
keywords: application, terraform cloud, github, deployment, policy, support terraform state cloud computing, advanced terraform